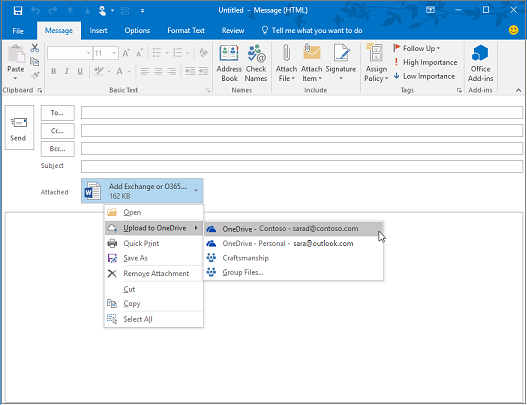
When you attach a document that is saved on your computer and not in an online location, you also can choose to upload the document to your OneDrive before sending the email. Uploading the attachment makes collaboration easy. You can be sure that everyone is collaborating on the same (and most up-to-date) version of the file.
- On the ribbon, click Attach File > Browse This PC, and choose the file you want to attach.
- In your email message, select the down arrow for the attachment.
- Choose Upload to OneDrive, and then choose the desired location for the file.
 NOTE: You might see choices such as the OneDrive location for your work account, the OneDrive location for your personal account, and document libraries for various groups you belong to.
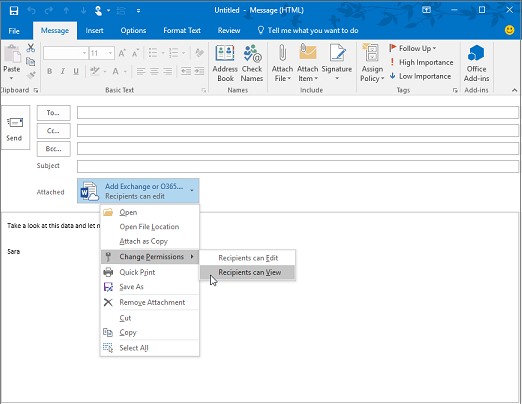
 - In your email message, select the down arrow for the attachment again.
- Choose Change Permissions, and then choose one of the following:
- Organization can Edit if you want anyone in your organization to be able to modify the file.
- Organization can View, if you want anyone in your organization to be able to read, but not modify, the file.
- Recipients can Edit if you want only the recipients of your email to be able to modify the file.
- Recipients can View if you want only the recipients of your email to be able to read, but not modify, the file.

Insert a picture into the body of an email message
When sending pictures, you can either attach the picture to the email message or insert the picture in the message body. To insert a picture that displays in the body of an email message, use the following steps:
- Position your cursor where you want the image in your message.
- Select Insert > Pictures.
- Browse your computer or online file locations for the picture you want to insert. Select the picture, then select Insert.
- To resize the picture, drag the handles at one of the four corners toward the center of the image or away from the center.
No comments:
Post a Comment