Thursday 29 June 2017

Outlook invalid email address / invalid recipient – Solutions

From time to time, Outlook may mistakenly report recipients as having invalid email addresses, although their email addresses are clearly valid. In this article we try to offer some solutions to this “invalid email address” Outlook error.

One product affected by this error is Easy Mail Merge for Outlook. While sending mass emails, Outlook may trigger an error reporting that the recipient’s email address is invalid. This error can also happen when you compose a regular email and send it to one of your contacts.
Outlook invalid email address

Solution 1 – empty auto-complete list

Usually, the “invalid email address” error happens when you have 2 or more contacts with the same name, but one of them doesn’t have a valid email address. The solution is to empty the Outlook auto-complete list.
To empty the list, you have to go to the Outlook File menu -> Options -> Mail -> scroll to the Send Messages section -> click on “Empty Auto-Complete List”.

Solution 2 – disable Outlook automatic name checking

Go to the Outlook File menu -> Options -> Mail -> scroll down to the “Send Messages” section -> un-mark the option “Automatic name checking”.

Solution 3 – check Outlook data files for errors

Sometimes, Outlook data files may become corrupted. causing all sorts of errors. It is never a bad idea to check the data files for problems: see this Microsoft tutorial.

Solution 4 – create a new Outlook profile

Try to create a new Outlook profile and see if the error still happens: https://support.microsoft.com/en-us/kb/829918.

Outlook 2013 Keeps Crashing? Here Is How To Fix It!

Outlook 2013 Keeps Crashing? Here Is How To Fix It!

SEPTEMBER 9, 2013
If your Outlook 2013 keeps crashing, read this article to find out the most frequent causes for Outlook 2013 crashes and their solutions.

Main reasons for Outlook 2013 crashes

There are four major reasons that can cause Outlook 2013 to crash:
– a Windows system infected with a virus / malware code;
– a hardware issue;
– corrupted Outlook installation files;
– damaged Outlook data files;
– a conflict between 3rd party add-ins or between Outlook and a 3rd party Outlook add-in.

How to identify your Outlook crash reason

The best thing to do is to download and install the Office Configuration Analyzer Tool. Here is its download page. This free diagnostics tool is a pretty new addition to the Office suite but it works for all Outlook versions starting with Outlook 2003. Unfortunately it isn’t mentioned anywhere in Outlook…
Once you’ve installed the Office Configuration Analyzer Tool (OffCAT), run it and choose to generate an Outlook report by clicking on “Start a scan” -> select Outlook -> type any name you want in the label section and click on “Start scanning”. The main advantage of this Outlook diagnostics method is that it reports not just information about your Outlook 2013 crashes, but it also scans Outlook for invalid registry entries, performance issues, outdated add-ins, available Outlook updates and other known issues. Do not ignore the suggestions prompted by OffCAT, otherwise these issues are likely to cause Outlook problems.
After the scan report was compiled, open it and look for the “Event Logs section: Application Event Log Entries for the Last Outlook crashes“. It should look similar to the below screenshot:
Outlook 2013 crash report


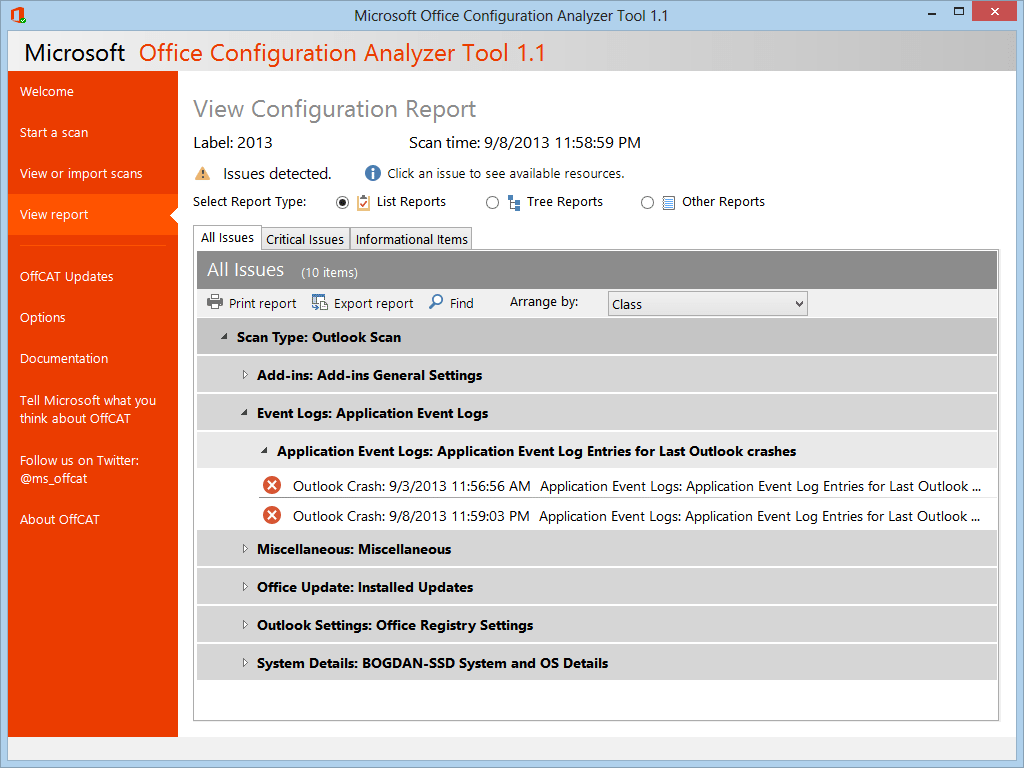
Notice the red icons in the above screenshot: they indicate Outlook crashes. If your Outlook 2013 crashed recently, OffCAT should report these crashes: click on one of them to open the actual crash event report.
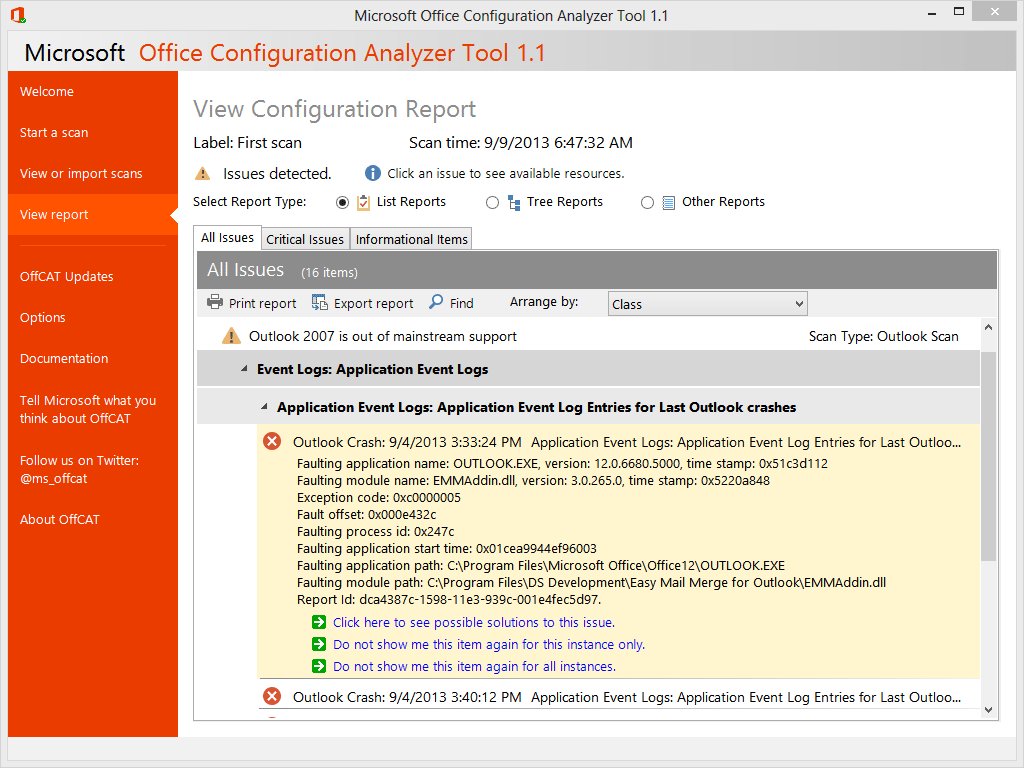
In the crash report, look for the “Faulting module name” and “Faulting module path” (this is the actual component that triggered the Outlook crash). Analyze the faulty module name and path. If the module name doesn’t ring any bells to you, look at the module path: if the path goes to the System32 folder, then you are dealing with a crash caused by Outlook itselfIf the path goes to Program Files folder, then the culprit is the program that was installed in that folder. For example, here is a crash report triggered by the Easy Mail Merge add-in for Outlook (notice that the faulting module name and path go to the DS Development folder – that’s us, the makers of Easy Mail Merge):

Outlook addin crash

Solutions for Outlook 2013 crashes

These solutions should also apply to previous Outlook versions, too.
As detailed above, if OffCAT reported an Outlook crash caused by a System file, you can try one of the following solutions:
– make sure you have the latest Office / Outlook updates applied on your Outlook 2013 installation (if you don’t know how to update it, here is how to update Outlook);
– start Outlook with the /firstrun switch, so it loads as if it is running for the first time (to use it, simply type “Outlook /firstrun” in the Windows RUN command box). If it solves your crashes, then the Outlook crashes were caused by an Outlook misconfiguration;
– use the ScanPST tool to check your Outlook data files for integrity errors. Assuming Office was installed on its default, path you can find it under C:\Program Files (x86)\Microsoft Office\Office15 (or C:\Program Files\Microsoft Office\Office15 for Windows / Office x64 or C:\Program Files\Microsoft Office 15\root\office15 for Office installed using “Click to run”);
– use the Microsoft online Outlook Product Stability Diagnostics Tool to check with the Microsoft support for similar issues and solutions. You need to have a Microsoft account to access it;
However… based on our experience of over 10 years of Outlook related support, we can safely say that most Outlook crashes are actually caused by different reasons: a faulty Windows system (infected by a virus or badly configured) or hardware issues that trigger system-wide errors, including Outlook crashes.
Feel free to use the comments system to post your Outlook issues, we will do our best to help you ðŸ™‚

Wednesday 28 June 2017

Repairing a corrupted workbook, Excel File

Applies To: Excel 2016 Excel 2013 Excel 2010 Excel 2007


When you open a workbook that has been corrupted, Excel automatically starts File Recovery mode and attempts to reopen and simultaneously repair the workbook.
Excel cannot always start File Recovery mode automatically. If you cannot open a workbook because it has been corrupted, you can try to repair the workbook manually.
You can also try other methods to recover workbook data when repairing a workbook is not successful. As a preventive measure, you may want to save your workbook often and create a backup copy every time that you save it. Or you can specify that Excel automatically creates a recovery file at specific intervals. This way, you will have access to a good copy of the workbook, if the original is deleted accidentally or if it becomes corrupted.


Repair a corrupted workbook manually

  1. On the File tab, click Open.
  2. In Excel 2013 or Excel 2016, click on the location where the spreadsheet is located, and click Browse.
  3. In the Open dialog box, select the corrupted workbook that you want to open.
  4. Click the arrow next to the Open button, and then click Open and Repair.
  5. Do one of the following:
    • To recover as much of the workbook data as possible, click Repair.
    • To extract values and formulas from the workbook when an attempt to repair the workbook is not successful, click Extract Data.

Recover data from a corrupted workbook

The following methods may help you to salvage data that might otherwise be lost. If one method is not successful, you can try another. You can also try third-party software solutions to try to recover workbook data if you cannot recover your data by using these methods.
IMPORTANT: If a disk error or network error makes it impossible to open a workbook, move the workbook to a different hard disk drive or from the network to a local disk before you spend time trying any of the following recovery options.
  • To recover data when the workbook is open in Excel, do one of the following:
    • Revert the workbook to the last saved version     If you are editing a worksheet and the workbook becomes corrupted before you save your changes, you can recover the original worksheet by reverting it to the last saved version.
      To revert the workbook to the last saved version, do the following:
      1. On the File tab, click Open.
      2. Double-click the name of the workbook that you have open in Excel.
      3. Click Yes to reopen the workbook.
        NOTE: The workbook reverts to the last saved version of the workbook. Any changes that may have caused the workbook to become corrupted have been discarded. For more information on recovering earlier versions of a workbook, see Automatically save and recover Office files.
    • Save the workbook in SYLK (Symbolic Link) format     By saving the workbook in SYLK format, you may be able to filter out the corrupted elements. SYLK format is typically used to remove printer corruption.
      To save the workbook in SYLK format, do the following:
      1. Click the File tab, and then click Save As.
      2. In the Save as type list, click SYLK (Symbolic Link), and then click Save.
        NOTE: Only the active sheet in the workbook is saved when you use the SYLK file format.
      3. If a message prompts you that the selected file type does not support workbooks that contain multiple sheets, click OK to save only the active sheet.
      4. If a message prompts you that the workbook may contain features that are not compatible with the SYLK format, click Yes.
      5. On the File tab, click Open.
      6. Select the .slk file that you saved, and then click Open.
        NOTE: To see the .slk file, you may need to click All Files or SYLK Files in the Files of type list.
      7. On the File tab, click Save As.
      8. In the Save as type box, click Excel Workbook.
      9. In the File name box, type a new name for the workbook to create a copy without replacing the original workbook, and then click Save.
        NOTE: Because this format saves only the active worksheet in the workbook, you must open the corrupted workbook repeatedly and save each worksheet separately.
  • To recover the data when you cannot open the workbook in Excel, do one of the following:
    • Set the calculation option in Excel to manual     To open a workbook, try changing the calculation setting from automatic to manual. Because the workbook won't be recalculated, it may open.
      To set the calculation option in Excel to manual, do the following:
      1. Make sure that a new, blank workbook is open in Excel. If a new, blank workbook is not open, do the following:
    • On the File tab, click New.
    • Under Available Templates, click Blank workbook.
      1. On the File tab, click Options.
      2. In the Formulas category, under Calculation options, click Manual.
      3. Click OK.
      4. On the File tab, click Open.
      5. Select the corrupted workbook, and then click Open.
    • Use external references to link to the corrupted workbook     If you want to retrieve only data and not formulas or calculated values from the workbook, you can use external references to link to the corrupted workbook.
      To use external references to link to the corrupted workbook, do the following:
      1. On the File tab, click Open.
      2. Select the folder that contains the corrupted workbook, copy the file name of the corrupted workbook, and then click Cancel.
      3. Click the File tab, and then click New.
      4. Under Available Templates, click Blank workbook.
      5. In cell A1 of the new workbook, type =File Name!A1, where File Name is the name of the corrupted workbook that you copied in step 2, and then press ENTER.
        TIP: You have to enter only the name of the workbook  — you do not have to type the file name extension.
      6. If the Update Values dialog box appears, select the corrupted workbook, and click OK.
      7. If the Select Sheet dialog box appears, select the appropriate sheet, and then click OK.
      8. Select cell A1.
      9. On the Home tab, in the Clipboard group, click Copy.
      10. Select an area, starting in cell A1, that is approximately the same size as the range of cells that contain data in the corrupted workbook.
      11. On the Home tab, in the Clipboard group, click Paste.
      12. With the range of cells still selected, on the Home tab, in the Clipboard group, click Copy again.
      13. On the Home tab, in the Clipboard group, click the arrow below Paste, and then under Paste Values, click Values.
        NOTE: Pasting values removes the links to the corrupted workbook and leaves only the data.
    • Use a macro to extract data from a corrupted workbook     If a chart is linked to the corrupted workbook, you can use a macro to extract the source data of the chart.
      To use a macro, do the following:
      1. Enter the following macro code in a module sheet:
        Sub GetChartValues() 
        Dim NumberOfRows As Integer 
         Dim X As Object 
        Counter = 2
        ' Calculate the number of rows of data.
        NumberOfRows = UBound(ActiveChart.SeriesCollection(1).Values) 
        Worksheets("ChartData").Cells(1, 1) = "X Values" 
        ' Write x-axis values to worksheet.
        With Worksheets("ChartData")
        .Range(.Cells(2, 1), _ 
         .Cells(NumberOfRows + 1, 1)) = _ 
        Application.Transpose(ActiveChart.SeriesCollection(1).XValues) 
        End With 
         ' Loop through all series in the chart and write their values to
        ' the worksheet.
        For Each X In ActiveChart.SeriesCollection 
        Worksheets("ChartData").Cells(1, Counter) = X.Name 
        With Worksheets("ChartData") 
        .Range(.Cells(2, Counter), _ 
         .Cells(NumberOfRows + 1, Counter)) = _ 
        Application.Transpose(X.Values) 
         End With 
         Counter = Counter + 1
        Next
        End Sub
      2. Insert a new worksheet into your workbook and rename it ChartData.
      3. Select the chart from which you want to extract the underlying data values.
      4. NOTE: The chart can be embedded on a worksheet or on a separate chart sheet.
      5. Run the GetChartValues macro.
      6. The data from the chart will be placed on the ChartData worksheet.

Automatically save a backup copy of a workbook

Automatically saving a backup copy of your workbook helps to ensure that you will have access to a good copy of the workbook, if the original is deleted accidentally or if it becomes corrupted.
  1. On the File tab, click Save As.
  2. In Excel 2013 or Excel 2016, click on the location where the spreadsheet is located, and click Browse.
  3. Click the dropdown arrow next to Tools, located next to the Save button, and then click General Options.
  4. Select the Always create backup check box.
For more information on saving and recovering earlier versions of a workbook, as well as information on recovering new workbooks (that you had not previously saved), see Recover Office files.

Automatically create a recovery file at specific intervals

Configuring Excel to periodically create a recovery file of your workbook helps to ensure that you will have access to a good copy of the workbook, if the original is deleted accidentally or if it becomes corrupted.
  1. On the File tab, click Options.
  2. In the Save category, under Save workbooks, select the Save AutoRecover information every check box, and then enter a number of minutes.
  3. In the AutoRecover file location box, enter the location where you want to save the recovery file.
  4. Make sure that the Disable AutoRecover for this workbook only check box is not selected.
For more information on saving and recovering earlier versions of a workbook, as well as information on recovering new workbooks (that you had not previously saved).


Excel not responding, hangs, freezes or stops working

This article discusses troubleshooting steps that can help resolve the most common issues when you receive an Excel not responding error or Excel hangs or freezes when you launch Excel or open a file. These type of problems may occur for one or more of the follow reasons listed below.
Follow the provided solutions in this article in order. If you have previously tried one of these methods and it did not help, please go to the next solution in the list.
NOTE: If you are having problems opening your Excel files after upgrading from Windows 7 to Windows 10, see Errors opening Office files after upgrading from Windows 7 to Windows 10.

Install the latest updates

You might need to set Windows Update to automatically download and install recommended updates. Installing any important recommendation and optimal updates can often correct problems by replacing out-of-date files and fixing vulnerabilities. To install the latest Office updates, follow the steps in this article:Update Office and your computer.
If installing the latest Office updates did not resolve your issue, continue on to the next item on this list.

Check to make sure Excel is not in use by another process

If Excel is in use by another process, this information will be displayed in the horizontal status bar at the bottom of the Excel window. If you try to perform other actions while Excel is in use, Excel may not respond. Let the task in process finish its job before attempting other actions.
If Excel is not is use by another process, continue on to the next item on the list.

Investigate possible issues with add-ins

While add-ins can enhance your experience, they can occasionally interfere or conflict with Excel. Try starting Excel without add-ins to see if the problem goes away. Here’s how:
  1. Do one of the following:
    • If you are running Windows 10, choose Start > All apps > Windows System > Run.
    • If you are running Windows 8, click Run in the Apps menu.
    • If you are running Windows 7, click Start.
    • For Windows 10 or Windows 8, type Excel/safe in the Run box, then click OK.
    • For Windows 7, type Excel/safe in Search programs and files, then click OK.
  2. If the issue is resolved, click File > Options Add-ins.
  3. Select COM Add-ins and click Go.
  4. Clear all the check boxes in the list and click OK.
  5. Close and restart Excel.
If the issue does not occur, start enabling the add-ins one at a time until the issues occurs. This will allow you to figure out which add-in is causing the problem. Be sure and restart Excel each time you enable an add-in.
If disabling add-ins did not resolve your issue, continue on to the next item on the list.

Repair your Office programs

Repairing your Office programs can resolve issues with Excel not responding, hanging or freezing by automatically repairing errors in Office files. For instructions on doing this, see Repair an Office application.
If repairing your Office programs did not resolve your issue, continue on to the next item on the list.

Check to see if your antivirus software is up-to-date or conflicting with Excel

If your antivirus software is not up-to-date, Excel may not function properly.
Check whether your antivirus software is up-to-date:
To keep up with new viruses that are created, antivirus software vendors periodically provide updates that you can download from the Internet. Download the latest updates by visiting your antivirus software vendor’s website.
For a list of antivirus vendors, see: Consumer security software providers.
Check whether your antivirus software is conflicting with Excel.
If your antivirus software includes integration with Excel you may experience performance issues. In this case, you can disable all Excel integration within the antivirus software. Or, you can disable any antivirus software add-ins that are installed in Excel.
IMPORTANT:  Changing your antivirus settings may make your PC vulnerable to viral, fraudulent or malicious attacks. Microsoft does not recommend that you attempt to change your antivirus settings. Use this workaround at your own risk.
You may have to contact your antivirus software vendor to determine how to configure your software to exclude any integration with Excel or to exclude scanning in Excel.