Add tracking to email messages
Applies To: Outlook 2016 Outlook 2013
You can add tracking to email messages to follow action that results from a message. This includes the following:
- Delivery and read receipts Get notifications when a message is delivered or read.
- Voting Take a simple yes or no poll or add custom voting buttons. Results are tracked and counted.
- Follow-up actions Flag a message that requires an action by you or a recipient.
Get a delivery or read receipt
A delivery receipt tells you that an email message was delivered to the recipient's mailbox, but not whether the recipient has seen it or read it. A read receipt tells you that a message was opened. In both cases, you receive a message notification in your Inbox.
NOTE: The message recipient might decline to send a read receipt. In addition, the recipient's email program might not support read receipts.
- In the open message, click Options.
- In the Tracking group, select the Request a Delivery Receipt or the Request a Read Receipt check box.
NOTE: Receipts are delivered to your Inbox, and are shown with this icon:  .
.
 .
.Add voting buttons
You can create a poll in Outlook by including voting buttons in a message that you are sending. Recipients' votes are delivered to your Inbox.
- In an open message, click Options.
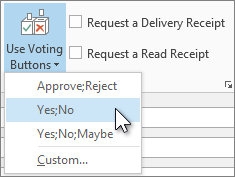
- In the Tracking group, click Use Voting Buttons.
- Click one of the following:
- Approve;Reject Choose this option to get approval on a decision from recipients.
- Yes;No When you want a definite yes or a no, this is the best choice.

- Yes;No;Maybe This voting option offers recipients a third option.
- Custom Create your own custom voting button names. For example, you can ask your colleagues to choose among restaurants for a lunch meeting.
- If you choose Custom:
- In the Properties dialog box, under Voting and Tracking options, select the Use voting buttons check box.
- Use the default button options, or delete the default options, and then type the text that you want. Use semicolons to separate the button names.
NOTES:
- Recipients can vote in the Reading Pane or in an open message. In the Reading Pane, click the Click here to vote line in the message header and then click the option that you want. In an open message, click Message. In the Respond group, click Vote, and then click the option that you want.
- The sender can see all responses in a table. On one of the response messages, click the The sender responded line in the message header, and then click View voting responses.
Flag a message for action
As a reminder for yourself
Do one of the following:
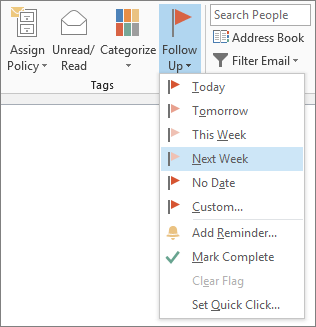
- In the message list, click the message that you want. Click Message. In the Tags group, click Follow Up, and then click the type of flag that you want to set.

- In an open message, click Message. In the Tags group, click Follow Up, and then click the type of flag that you want to set.
If you want a reminder about this flagged message, click Message. In the Tags group, click Follow Up, and then click Add Reminder. You can change the reminder date and time.
As a prompt for others
To send a flag so that others are prompted to do something, do the following before you send the message:
- In the open message, click Message. In the Tags group, click Follow Up, and then click Custom.
- In the Custom dialog box, click Flag for Recipients.
- Under Flag for Recipients, in the Flag to list, click the type of flag that you want to send.
- To include a reminder for recipients, select the Reminder check box and set a date and time.
No comments:
Post a Comment