Wednesday, 26 July 2017

Microsoft Stream now available worldwide—new intelligent features take enterprise video to new heights

Video has become an increasingly important medium in both the consumer and business realms. In the workplace, video is a key way to share information, educate and train employees, drive engagement and build culture.
Last year, we released a preview of Microsoft Stream, the intelligent enterprise video service that makes it easy for people inside any organization to securely upload, share, manage and view videos. Today, we’re excited to announce that Microsoft Stream is now generally available as a standalone service and is rolling out to Office 365 Enterprise customers in 181 markets and 44 languages. We’re also announcing new intelligent features that take productivity and user engagement to new heights.

A single destination for video—unlimited personalized experiences

Microsoft Stream is a single destination for video management, with built-in intelligence, deep integration across Office 365 and the IT management and security capabilities that businesses of all sizes require. It gives individuals a destination to contribute, search and discover all their company videos. It is also now the cross-suite video service for Office 365 in the enterprise, making it seamless for people to share videos inside Office 365 applications like SharePoint, Microsoft Teams and Yammer. Microsoft Stream is also integrated with Office 365 Groups, which means every group has a designated channel—making it even easier to manage content across teams.
Here’s a look at how intelligence is infused throughout the Microsoft Stream experience:
  • Speech-to-text transcribed audio—Transcribed audio becomes searchable text. Simply type in descriptive keywords to jump to any point in a video they are spoken.
  • Face detection—With face detection, viewers can see where each person in the video is shown throughout the video. A clickable timeline indicates every place they appear.
  • Linked timecodes—Timecodes are displayed within the comments section and are linked to the text transcripts or table of contents, so you can jump to a specific point in the video.
A laptop displays Microsoft Stream and its newest features.

Connected and secure video—anywhere, anytime

Microsoft Stream utilizes built-in, industry leading encryption and authenticated access for video to ensure our customers are sharing content only with the intended audiences. Intuitive security features that utilize existing organizational identity through Azure Active Directory and Office 365 Groups make security management simple. Additionally, administrators can add custom guidelines or require employees to optionally accept terms before they can begin to upload videos. Videos provide a seamless and secure viewing experience across devices and screens and work wherever you are—at home or in the office. Microsoft Stream videos are also more accessible, with features like closed captioning, screen readers, keyboard navigation and high contrast.'

Modern video service reimagined

Microsoft Stream builds on the learnings from Office 365 Video to bring intelligence and deeper integration into Office 365 and beyond. To learn more about the Office 365 Video transition to Microsoft Stream, visit our website.

Start using Microsoft Stream today

If you are a current Office 365 customer, you can find Microsoft Stream in the Office app launcher or visit the Microsoft Streamwebsite to sign in. If you don’t have Office 365, try a Microsoft Stream standalone plan or start your free trial right away.

Tuesday, 25 July 2017

25 hidden iPhone features that are really, truly hidden

Redial: In the Phone app, press the green call button on the keypad screen to make the last dialed number appear.
Clear cache: Make your iPhone run faster by clearing out the cache in several of Apple’s apps using a secret trick. In the App Store, Podcasts, Music, Game Center and Phone apps, tap on any single tab icon at the bottom of the screen 10 times in a row.
Make TouchID work faster: Save the same fingerprint multiple times as different entries and TouchID will work much faster. This is especially useful on older phones like the iPhone 6 and iPhone 5s.
Spotlight conversions: Open Spotlight and type something like “20 euros in GBP,” and it will instantly perform the conversion.
Spotlight math: Want to do a quick math problem? No need to open the Calculator app, just pull down to open Spotlight and type it right there.
Delete numbers in the Calculator: Speaking of the Calculator, you can delete single digits when you tap the wrong number by swiping left or right on the screen where the numbers appear.
Clear RAM to make your phone run faster: Hold down the power button until you see “Slide to power off,” then let go and hold down the home button until the screen goes blank and your home screen reappears.
Burst mode: Hold down the camera’s shutter button to shoot in burst mode.
Remote shutter: Use the volume up or down button on your headphones to snap a photo in the Camera app.
Turn the flashlight off: How many times have you turned your flashlight on and wished that you didn’t have to swipe open the Control Panel again to shut it off? We’ll save you a step: simply swipe up on the camera icon on your lock screen and the flashlight will turn off.
3D Touch while drawing: All of the drawing tools and the eraser are pressure sensitive in the Notes app.
Close multiple apps at once: Double-tap the home button to open the app switcher and you can use two, even three fingers to slide multiple apps closed with one swipe.
Recently closed tabs: Want to reread this article on your phone but you forgot what site you were reading it on in the first place? Simply tap and hold on the + symbol in Safari on the tab carousel view to open a screen that lists all of your recently closed tabs.
Desktop version of a site: We all know you can request the desktop version of a mobile site in Safari but it’s easier to do than you think. Just hold down the reload button in the URL bar.
Peek at tabs: Not sure you want to open that tab in the Safari tab carousel? A 3D Touch will let you Peek at it first.
Peek at bookmarks: Did you know you can use 3D Touch to Peek at bookmarks before you open them?
Edit reminders: 3D Touch an item in your Reminders app to edit the time or add a location.
View only unread emails: So you don’t practice “inbox zero” like I do but you only want to see unread emails in your inbox. Tap the Mailboxes link in the top right corner of the Mail app and then tap Edit. Tap the circle next to “Unread” and you’ll have a new folder that contains only your unread emails.
Save a draft with one swipe: In the Mail app, tap on the subject line and swipe down to the bottom of the screen to save a draft.
Quick Reply: When you get a notification at the top of the screen that you have a new iMessage or SMS, pull the notification downward to reply without leaving the screen you’re on.
Hidden level(s): Slide to the left in the Compass app open the level. Then place your phone flat with the screen facing away from the ground to reveal a bubble level.
Artist Peek: 3D Touch an artist in the Music app to Peek at their music.
Reenable Low Power Mode: When Low Power Mode automatically shuts off as you charge, you’ll get a notification on your lock screen that it has been disabled. Swipe left on that notification to turn it back on.
Find an iPhone’s owner: Did you find a lost iPhone in a bar? Simply ask Siri, “whose phone is this?” and it will show you so you can get in touch with him or her and return it.
Reachability: This is one of the new iPhones’ best features and there are still SO many people who don’t know about it. Double-touch (don’t tap, touch) on the home button and the entire screen will shift down so you can reach the top without shifting your grip.

Can't Access your Microsoft account? Escalate your issue to Microsoft Account Specialist Team

If you have already exhausted all possible self-service option for your issue, you can escalate your issue to the level 2 support : Account Specialist Team by submitting an Escalation Support Ticket. This might take a little of your time but it's worth to do.
(Note: They can only be contacted through this ticket submission, in this way they can guarantee the security of your support request).

Below is the instruction on how to submit the Escalation Support Ticket.
Things that you need?
  • 1.) Other "accessible & active" Microsoft Account. Why? Because the ticket can  only be access through Microsoft account. This is the only way we can guarantee the security of your information. 
  • ( you can sign up and get one at    https://signup.live.com if you don't have one) 
  • 2.) An updated browser (IE 9.0 +, Google Chrome or Firefox).
Here's how you do it.

STEP 1:
Log in your Microsoft Account at http://account.live.com  (With your most accessible Microsoft Account as discussed on things that you need above)
**Why? Because the ticket can only be access through Microsoft account for you to be able to see the ticket. ( you can sign up and get one at    https://signup.live.comif you don't have one) 
Image
STEP 2:
After signing in, please go the link below and wait until the page loads completely and you should see the escalation ticket form.
               Support Request Ticket -- Click here !
STEP 3: 
Once you successfully see the ticket like what you should see using the image below, you can now follow the form on how you can escalate you support ticket by following the image below.

NOTE: 
After submitting the form, you will will receive a confirmation email on your contact Microsoft account. But just to set your expectation, this might take within 24 hours to review your concern.Image
**Reminder : You will receive a reference number that starts with SRX***********ID and kindly keep it so you can able check and follow up your support request.
**You may check the status of your support request using the link below.  (Sign in with the Microsoft Account that you use to submit your support request)
                  Escalation Status Check Link - Click here
Thank you for your time and cooperation.
Please comment if this helps you a lot.
                                     **  Please click on the link below to contact us back **

                                    Contact Us - Microsoft Account Support **CLICK HERE**

How to Sync your Windows PC and Phone Documents folder with OneDrive

Want to automatically sync your Documents folder with OneDrive or OneDrive for Business? Here’s how.
TIP: You can also sync other known folders—such as Desktop, Pictures, and Music—with OneDrive or OneDrive for Business.

Before you begin

Before you sync the Documents folder on your computer with OneDrive, make sure that there’s a Documents folder in your OneDrive or OneDrive for Business folder:
  1. On your taskbar, select File Explorer The File Explorer icon. .
    You can also open File Explorer by pressing the Windows key The Windows key icon. + E on your keyboard.
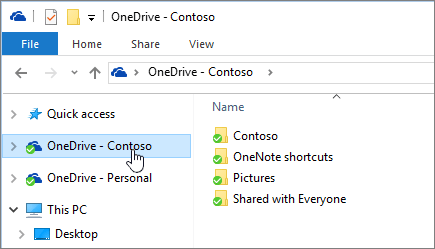
  2. In the left pane, select your OneDrive or OneDrive for Business folder.
    A screenshot showing File Explorer with the OneDrive for Business folder selected.
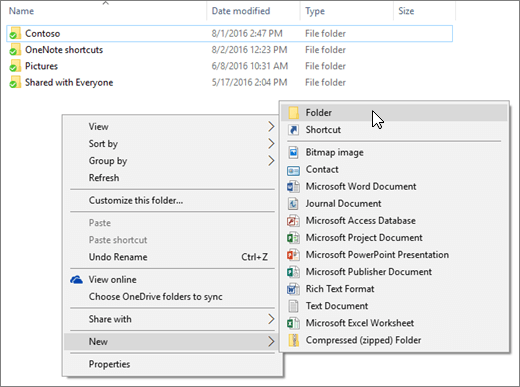
  3. If there isn't a Documents folder inside your OneDrive or OneDrive for Business folder, right-click inside the right pane and select New > Folder.
    A screenshot showing the right-click menu in File Explorer.
  4. Name the new folder Documents.

Sync your Documents folder with OneDrive

If there’s a Documents folder in your OneDrive or OneDrive for Business folder, you’re ready to sync the Documents folder on your computer with OneDrive. Here’s how:
  1. On your taskbar, select File Explorer The File Explorer icon. .
    You can also open File Explorer by pressing the Windows key The Windows key icon. + E on your keyboard.
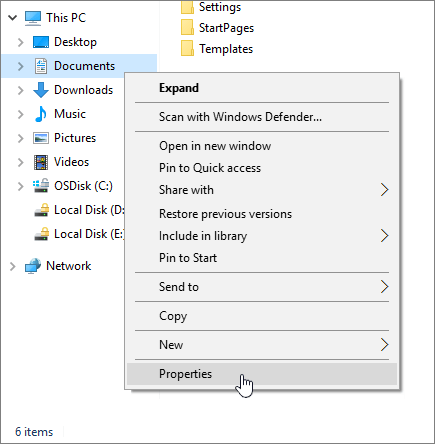
  2. In the left pane, under This PC, right-click Documents and select Properties.
    A screenshot showing the cursor right-clicking on Documents in File Explorer.
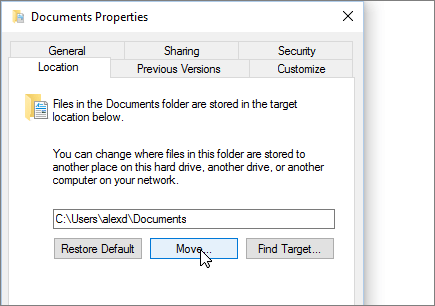
  3. Select the Location tab and select Move.
    A screenshot showing the Documents Properties menu in File Explorer.
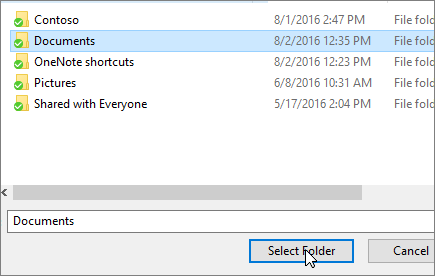
  4. In the left pane of the Select a Destination dialog box, select OneDrive or OneDrive for Business, select the Documents folder, and click Select Folder.
    A screenshot showing the Select a Destination dialog box in the Documents Properties menu.
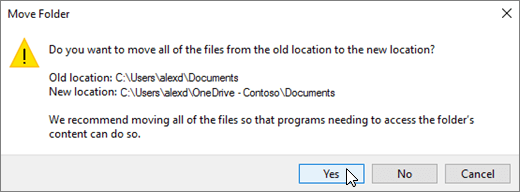
  5. Select Apply, and in the dialog box that appears, select Yes.
    A screenshot showing the warning that appears when you click Select Folder in the Select a Destination dialog box.

Are you an admin?

If you’re an admin, you can redirect known folders (such as Documents) to the OneDrive for Business sync location for the users in your domain. To learn more, see Redirect known folders to OneDrive for Business.

How to change the Outlook Start Up Folder

How much OneDrive storage do I get with Office 365?

The amount of additional storage that you get depends on your subscription:
  • Customers with an active Office 365 Personal or Office 365 University subscription receive an additional 1 TB of OneDrive storage per subscription.
  • Customers with an active Office 365 Home subscription receive an additional 1 TB of OneDrive storage per user, for up to 5 users. Each additional user must have their own Microsoft account and be added to the Microsoft Account site.
The additional storage is applied to the OneDrive account that is linked to the Microsoft account used to create the Office 365 subscription. For Office 365 Home, the storage is tied to the Microsoft accounts of the household members who have been added to the subscription.


Connect the power of Excel to your Facebook ad accounts with FAME

Facebook advertisers frequently rely on the power of Excel to manage their ads accounts and evaluate performance, but exporting multiple Facebook accounts to an Excel worksheet takes time. With Facebook Ads Manager for Excel (FAME) you can quickly run a single report to download data from multiple ad accounts, helping you save time and work faster.


Downloading XLS or CSVs from multiple ads accounts and organizing metrics for custom reports takes a good deal of manual effort. And reports to evaluate ads data are requested with increasing regularity. While it is possible to develop customized reporting solutions using the Facebook Marketing API, these App based tools rarely provide the familiarity or flexibility of Excel.


Facebook Ads Manager for Excel, or FAME, allows advertisers to build their report templates in Excel and dynamically download rich performance data directly into sheets. Data can be combined from multiple Facebook ads accounts without manual integration  . And information can be refreshed weekly, or as often as every 15 minutes, to ensure your data is always up-to-date.


FAME is available for free in the Microsoft Office Store. The FAME add-in seamlessly integrates with Excel 2016 to provide reporting capabilities.
Sign in with your Facebook account, and you’ll be able to create and download reports. Pre-designed templates help you quickly pull down common metrics, or customize your reports to deliver exactly what you need to know.
Facebook Ads Manager for Excel requires Microsoft Excel 2016. To download FAME from the Office Store complete the following steps:
  1. Open Excel 2016 on your computer.
  2. Click the [Insert] tab.
  3. Click [Store] to go to the Office Store.
  4. In the [Search] box, type “Facebook Ads Manager” and then click <MAGNIFYING GLASS ICON>. You should now see Facebook Ads Manager for Excel in the list.
  5. Next to Facebook Ads Manager for Excel, click [Add].
Download the add-in today and get ahead of your campaign reporting!

Monday, 24 July 2017

Improving People in Outlook for iOS and Android

on the go. With latest release, we’re addressing one of our most highly requested features with improvements to our People experience.
You will now have the ability to add and edit contacts right from Outlook on iOS, coming soon on Android. We’ve also completely redesigned the contact card to show more details—including latest conversations and shared files—and enabled easier calling and messaging with your contacts.
Here’s a deeper look at what’s new.

Add or edit your important contacts while on the go

With our latest update, you can now add and edit contacts for Outlook.com and Office 365 accounts (support for Google contacts coming soon).
To create a new contact in Outlook, simply go to the People tab and tap the + sign. You can also add a new contact directly from a message or event by tapping the name of a person and then tapping Add Contact. Lastly, you can also use the search bar in the People tab to find and add contacts from your company directory.
Once you’ve added a contact, you can edit their information by opening the contact and tapping the Editbutton. Any changes made in Outlook for iOS will be synced and available across all versions of Outlook.
Left: new contact information displayed on a device screen. Right: contact details displayed on a device screen.

View details about your contacts at a glance

The contact card has also been redesigned to put your contacts’ key details front and center. Tap on any name in your messages or events to access phone numbers, email addresses and other details, like Skype IDs, along with your contact’s picture. Tapping a phone number will allow you to choose between calling, messaging or FaceTiming your contact.
The new contact card now also displays your recent conversations, shared attachments and any upcoming meetings you have with that person.

Save contacts to your device

While you can fully manage your contacts in Outlook, you can also save your contacts to the default Contacts app on iOS and Android. This allows you to easily see the name of a contact when you receive a call or text message from them, and view all of their contact information directly in the built-in Contacts app.
Due to the underlying capabilities of iOS and Android, Outlook provides a one-way push of contact information from Outlook to your phone. Newly added contacts and changes made in Outlook will sync to your built-in Contacts app. However, edits made in the contacts app will not sync back to Outlook or your email service.
To enable Caller ID with your Outlook contacts, navigate to your account within Settings and tap Save Contacts. If you’d like to remove the contacts at a later time, you can toggle the switch in Outlook and they will be removed from your address book.

What’s new with OneNote in the classroom—LMS integrations, Researcher and more stickers

OneNote Class Notebook improvements

With this update we made several additions and improvements for the Class Notebook add-in (version 1.7.0), including:
  • Assignment and grade integration with Edsby.
  • Schoology assignment and grade integration improvements.
  • Skooler assignment and grade improvements.
For details on how to attach your OneNote Class Notebook to an LMS or SIS and create assignments and grades, see “Class Notebook add-in getting started guide.”

Add some fun to your notebooks with new sticker packs

One of the most popular education features we’ve added to OneNote over the past year has been stickers! We’ve seen teachers use and customize stickers in lots of fun and personalized ways. Today, we are launching two new sticker packs: Silly Supplies and Cacti Friends.
Screenshot of new sticker packs, including Silly Supplies and Cacti Friends.

Improve reading comprehension with Learning Tools updates

We’re also rolling out a new version of the OneNote Desktop Learning Tools add-in (version 1.4.0), which improves reading comprehension by:
  • Improved Syllables accuracy for English.
  • Added Syllables functionality for four new languages—French, German, Italian and Spanish.
  • Improved word detection and highlighting for Chinese and Japanese.
  • Transition to HelpShift for Support email.
Noun, verb and adjective highlighting will be coming to Spanish, French, German and Italian later this summer.

More updates to support you in the classroom

Find credible sources and content right within OneNote—Researcher is now rolling out in OneNote, making it easy for you to research your essay topic, create outlines and add sources—all without leaving the app. This means you can stay focused and save time, all while researching your topic. Researcher in OneNote for Windows 10 requires an Office 365 subscription, and is also available in Word on Windows desktops and Macs.
Researcher is being shown in OneNote for Windows 10 alongside an outline being crafted on economic trade theory. The Researcher pane is opened, the term “global economy” is typed into the search box, and results for related material are sifted through. A specific article is selected, a piece of text is highlighted and copied with a single click into the OneNote outline.
Take your Class Notebooks with you—Now you can save a copy of your notebook to your work or personal OneDrive. We know students or teachers move schools and classes; now your notes don’t have to be left behind at the end of the school year. Learn how in just a few steps.
Redesigned OneNote for Windows 10 now available—Last month, we announced the new design for OneNote, which enhanced usability for those who use assistive technologies, simplified navigation controls and created consistency across devices. Now it is fully available on OneNote for Windows 10.
See how schools are already benefitting from switching to OneNote for Windows 10:
That’s a wrap on OneNote for June. Stay tuned for more this summer! To get OneNote, leave a suggestion or ask for help, follow these links:

June 2017 updates for Get & Transform in Excel 2016 and the Power Query add-in

 Get & Transform—a powerful set of Excel 2016 features based on the Power Query technology, which provides fast, easy data gathering and shaping capabilities. These updates—requested by many of our customers—are available as part of an Office 365 subscription. If you are an Office 365 subscriber, find out how to get these latest updates. If you have Excel 2010 or Excel 2013, you can also take advantage of these updates by downloading the latest Power Query for Excel add-in.
These updates include the following new transformation features and improved data connectivity features:
  • New transformation features:
    • Add Column by Example.
    • Split Column (by Delimiter/Number of Characters) into rows.
    • Basic mode for Group By operation.
    • Extract Text Before/After/Between Delimiters.
    • Unpivot Only Selected Columns.
  • Combine Files experience—ability to reference first file as example.
  • New Go to Column in Query Editor.
  • SAP HANA Connector—enhancements to Parameter Input UX.

Add Column by Example

With this update, we added a new capability to the Query Editor that allows you to create a new column by specifying a set of examples of the desired output. Based on these examples, Excel automatically detects and applies the required transformations.
This is an innovative approach to defining query steps within the Query Editor, which simplifies the process for basic users, as they no longer need to come up with an algorithm or complex logic for how to transform or extract data from other columns or how to define those transformations in the Query Editor.
Query Editor dialog is displayed with Add Column selected so user can add a column from an example.

Split Column (by Delimiter/Number of Characters) into rows

We added a new option in the Split Column by Delimiter and Split Column by Number of Characterstransformation dialogs that allows you to specify whether to split into new columns (previous default behavior) or split into new rows.
This new option can be found under the Advanced Options section in these two dialogs.
The Split Column by Delimiter dialog is displayed with Advanced options highlighted.
The Split Column by Number of Characters dialog is displayed with Advanced options highlighted.

Basic mode for Group By operation

The new Basic mode in the Group By transform dialog simplifies the experience to group by a single column and define a single output column. You can switch between Basic and Advanced modes within the Group By dialog by selecting the desired option at the top of the dialog.
The Group By transform dialog is displayed with the Basic option selected. User can click the Advanced radio button to display the advanced options.

Extract Text Before/After/Between Delimiters

We added a new option to extract all text before, after or between delimiters from a Text column. You can find these new commands under the Extract drop-down menu on the Transform and Add Column tabs on the Query Editor ribbon.
The Transform tab is selected, and the Extract drop-down menu is expanded to highlight the Text Before Delimiter and the Text After Delimiter options.

Unpivot Only Selected Columns

A new transform was added under the Unpivot Columns menu in Query Editor that allows you to unpivot only the currently selected columns in the Query Editor preview. This generates an explicit columns list in the current step so that the same set of columns is unpivoted on future refresh operations.
The Transform tab is selected, and the Unpivot Columns drop-down menu is expanded to highlight the Unpivot Only Selected Columns option.
In addition to the newly added Unpivot Only Selected Columns option, you can also apply one of the following (and previously familiar) commands from the Unpivot Columns menu:
  • Unpivot Columns—This operation will unpivot all columns except all the non-selected ones. This case is optimized for scenarios where new columns that appear in the future need to be unpivoted as well. For example, datasets where new columns represent data for new dates (i.e., monthly sales, weekly occurrences, etc.).
  • Unpivot Other Columns—This operation provides the same capability as Unpivot Columns in terms of future behavior with respect to new columns appearing in the table. The main difference with Unpivot Columns is that it allows you to select the columns that should not be unpivoted. This case optimizes the user flow for cases where the number of columns that should not be unpivoted is much smaller than the number of columns that should be unpivoted, similar to the behavior of Remove Other Columns compared to Remove Columns.

Combine Files experience—ability to reference first file as example

We improved the Combine Files experience by allowing you to always reference the first file in a folder as the example file. Before this update, you had to pick a specific file by name, which might cause errors in the future if such file is removed from the folder.
With this update, you can select First file in the Combine Files dialog, which will ensure that the first file in the folder is used as the example, regardless of the specific file name.
The Combine Files dialog is displayed with the First file option highlighted.

New Go to Column in Query Editor

When working with tables that have many columns, it is hard for users to scroll in the Query Editor preview to find the column that they want to apply transformations to.
In this month’s release, we added a new Go to Column command to the Home tab on the Query Editor ribbon that allows you to search within the list of columns and select the column that they would like to scroll into preview and select.
The Home tab is selected, and the Choose Columns menu is expanded to highlight the Go to Column option.

SAP HANA connector—enhancements to Parameter Input UX

We improved the Parameter Input UX for the SAP HANA connector in a couple of ways:
  • You can now filter down the list of parameters to only required parameters.
  • We moved away from drop-down menus for single/multi-selection input controls and started using a popup dialog for both scenarios. This new dialog allows users to see both the ID and Caption for each parameter value, as well as search within the list of values by any of these two fields. This makes it easier to provide input values, as opposed to the previous experience that only allowed input IDs.